In thinkorswim, you can share your personal items such as chart setups, order and alert templates, workspaces, and many more with other traders. When you share an item, the system creates a special link that, when clicked, opens the item with the same configuration in the recipient’s platform. If the recipient does not have the platform installed on their device, they will be prompted to install it.
In addition to sharing and receiving the items, users of thinkorswim have the ability to update the items they’ve received with new data and keep the entire history of changes in all shared items. When you share an item, you have the choice of either publishing it as a new item or an update to a previous item of the same type.
Here is how sharing works in thinkorswim:
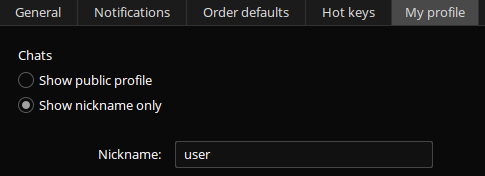
1. Before you start sharing items, you need to set up a profile in the Application Settings. To do so, click Setup in the top-right corner of the thinkorswim window and choose Application Settings… On the My profile tab, specify a nickname. It will be used in thinkorswim chats and sharing. If you wish, you can also create a public profile with additional info and avatar.
2. Based on the item type you wish to share, do the following:
- Grid. Click on the Grid icon
 above the grid and select Share grid… in the menu that appears. If you wish to share a different previously saved grid, click Share in the same menu and select the grid you would like to share.
 - Workspace. Click Setup in the top-right corner of the thinkorswim window and choose Share workspace…
- Watchlist. Click on the Show actions menu button
 in the watchlist header and choose Share ‘watchlist_name’. If you wish to share a different previously saved watchlist, click Share in the same menu and select the watchlist you would like to share.
 - Order template. On the Saved Orders tab of the Order Entry dialog, scroll down to the order template you wish to share. Click on the small Action icon
 that appears when you hover over the rightmost cell of the order row. Choose Share order template…
 - Alert template or thinkScript alert. In your Alert Book, scroll down to the alert template you would like to share. In the Actions column, click on the Actions icon and choose Share alert template… Alternatively, you can just click on the Share button
 in the top-right corner of the dialog that appears when you create your alert. Note: You can only share price and study-based alerts.
 - Chart. Click on the Share button
 above the chart.
 - Scan query. Click on the Show scan query menu icon next to the Sizzle index and select Share scan query… in the menu that appears. If you wish to share a different previously saved query, click Load scan query, then Share, and then select the query you would like to share.
- thinkScript study or strategy. Open the study or strategy in the thinkScript Editor and click Share in the top-right corner of the editor window.
- thinkScript quote. In the Customize Quotes dialog, scroll down to the custom quote you would like to share. Open it in the Custom Quote Formula editor by clicking on the scroll icon
 before its name. Click Share in the top-right corner of the editor.
 - Flexible grid. Click on the Show grid actions button
 above your flexible grid and choose Share flexible grid… If you wish to share a different previously saved grid, click Share in the same menu and select the flexible grid you would like to share.
 - Company profile forecast. In the Company profile dialog, click on the Show actions menu button located within the What drives the Stock header and choose Share…
- Economic Data chart. Click on the Symbol actions button in the top-right corner of the Economic Data chart you would like to share. Click Share <chart_name>.
- Order. To share a specific order from the Monitor tab, turn on the Share order switch in the Order Confirmation dialog.
- Color scheme. To share your custom application color scheme, navigate to Application Settings > Look and feel. In the Color scheme dropdown list, choose Share, and then select the color scheme you would like to share.
- Phase Scores. In the Phase Scores gadget header, click on the Data group box. In the menu that appears navigate to Share and then choose the data group that you wish to share.
Doing any of the above will open the Share dialog.
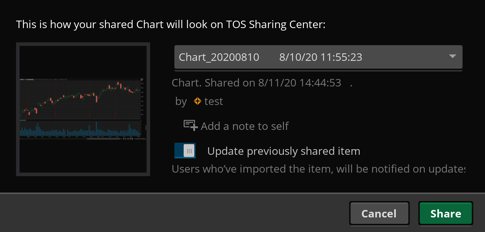
3. Using the Share dialog, you can either share your item as a new link or an update to a previously shared item:
- If you wish to share the item as a new one, consider changing its name and adding a note to it. Notes are for personal use only and will not be shared with anyone. Click Share.
- If you wish to create an update for a previously shared item, turn on the Update Previously Shared Item switch. The Name text box will now be displayed as a dropdown list, from which you can choose a previously shared item to update. Click Share.
A link to the shared item will be created. Clicking on this link will open the thinkorswim sharing portal tos.mx. There will be a preview of the item, and the users will be prompted to view it in thinkorswim.
4. You can find all of the items you’ve shared and items shared with you by other thinkorswim users on the Shared Items page located under the Tools tab.
Importing shared items
When a user receives a link to a shared item and opens it in thinkorswim, the item preview opens. From there, the user may choose to import this item, in which case the item will be saved in the user’s Shared Items page. By default, updates are enabled for each imported item, which means that the user will be notified when an update is available for the shared item they’ve received.
When you import a named item (i.e., an item that has its own name within thinkorswim, not just sharing), you have the choice of importing it as is, rewriting your own item, or saving it as a new entity:
- To import the item as is, just click Import in the preview.
- To rewrite your own item, select the item you wish to rewrite from the Import item as dropdown list and click Import.
- To save the item as a new entity, select Create new... from the Import item as dropdown list, edit the name, and click Import.